
Last updated on October 22nd, 2021 at 12:36 pm
Digital swim meet entry files saves both meet directors and team admins time and headaches. As a result, most meet directors, team admins, and coaches prefer using electronic means to share swim meet entries and results over a manual method. Team Manager for Swimming is one software teams can use to both manage their swim teams and also create and send digital swim meet entry files. This software also receives and imports digital results files after the meet. Patrick Thurman created the following instructions to help coaches and team admins of high school and summer league swim teams use Team Manager for Swimming software. He is the Director of Athletics at Utah’s Corner Canyon High School and the swim team head coach at that school. Thanks for sharing Patrick!
Contents for Basic Team Manager Set-up Guide
Team Manager for Swimming Software
Team Manager For Swimming is swim team administration software. On the developer’s Active HyTek website, you can find out more about it and other software they’ve created.
Team Manager for Swimming Setup Checklist
If brand new, start here. If returning from last year, skip to Updating your TEAM MANAGER from last season.
Season Set-Up
Open up Team Manager on your computer, click on File, and then Open/New. Type in the name for the database (I suggest the name of your team). A system preferences screen opens. Your preferences should look like the following:

Adding a New Team
Next, click on Teams to create your team. Click on Add and type in your team name. It’s only needful to fill out the top box, the program does not require the other information to add a team.
Utah High School Teams: Please use the team name of your club, as well as the appropriate abbreviation. You’ll find Utah high school team abbreviations at the www.utswimcoach.com website. Click on HS Team Abbreviations to find yours. All classifications are in one database. To differentiate, use the LSC code to separate. HI=2A, VA=3A, AK=4A, UT=5A, CO=6A. After you click “OK” the program will create your team.

Updating your TEAM MANAGER from last season
If you are a returning coach, update the information on your coaches under the Teams tab.
Unless someone knows a quick way of updating your athletes from last year, you will have to manually update the grade for every swimmer. I like to keep data, so I click on the Inactive button for any swimmer who is no longer on my team.
Adding and Managing Athletes
Next, add your athletes. Get back to the main screen. Once there, first, click on Athletes. Next, click Add. You must complete the following fields:
- Last Name
- First Name
- Birthdate
- Gender
- Team
- School Year.
For School Year use 9, 10, 11, and 12. Any contact info is convenient.
QUICK TIP: Once you’ve added a family member’s contact info, for example, a parents’ name and phone number, then you can add that information to other siblings with a click of a button.

Large Team Tip–Use Groups
For organizational purposes, you can put your athletes into groups. For example, at my school, we have to divide up our team into practice groups due to our team size. Organizing the team by groups helps when I do meet entries. This is because I quickly know what swimmers to consider for different events, relays, and meets. Other teams might have Varsity and JV groups. You can create groups on the Set Up tab from the Main Screen and go down to Groups/Sub Groups/Codes. I have also set up subgroups based upon if they are swimming mornings, afternoons, or on club teams.

Adding Swim Meets
Swim Meet Setup
Click on Meets and then Add. You will have the screen below that pops up. Make sure to fill in the circled boxes.

If you don’t know the ZIP code, enter zeroes. Make sure that the “Course” is set correctly! Some schools swim S (short course meters). Everyone else is Y (yards). If you include Time Trials or any other ‘unofficial meet’ on Team Manager, leave the Meet Type blank. For meets that will count towards qualification for Invites and Championship Meets, set the Meet Type to HS. After clicking Save you’ll advance to the Entry Fees screen. Click Save again and you will be on the Eligibility Rules screen.
Entry Times Setup
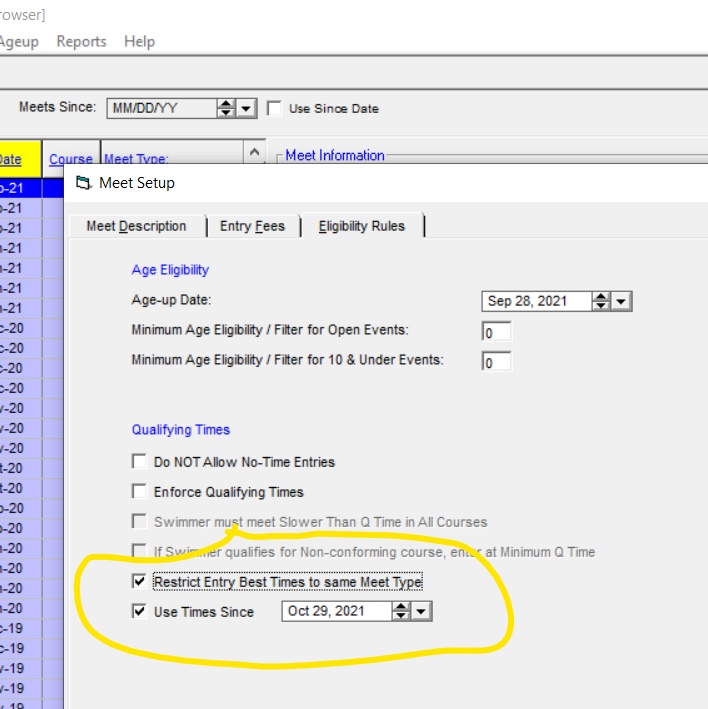
For any official meet, click Restrict Entry Best Times to same Meet Type. Each year I also set the “Use Times Since” box to the first date meets can be held. This will help you (and the Meet Directors) when you send in your State Entries. The only times that should pop up when doing your State Entries will be from meets that count towards State for the current swim season, as opposed to using relay times from previous years or time trials times. Repeat this step for all of your meets and you are good to go.
Event Setup
On the same Meets screen, click on Events at the top. If you are using the same database, click on Copy Events. Scroll down to a previous meet and click on it. Then make sure you choose the All Events box in Copy Options and Both in the other Copy Options box.

You can repeat this step for all of your meets making you set for the season. Make sure to choose meets that match the course you are swimming. For example, if you are swimming at a meters pool, select a previous meet swum at a meters pool.
New Database Event Tip
If you are starting a new database, I would recommend reaching out to another coach. Ask for a copy of a meet. Creating an event database from scratch is time-consuming and detailed. Any mistake can lead to problems that could mess up your meet entries. This could prevent your swimmers from being entered in a meet. Another option is to get a Meet Manager file from the www.utswimcoach.com website. Once downloaded, you can open it with Meet Manager software and then export the swim meet events to a file you can then import into your Team Manager software.
Large Team Tips: Swim Meet Entries
Many teams have a large number of swimmers. Here are some tips to help with swim meet entries.
Swimmer Entry Status Feature and Reports
You might be familiar with Swimmer Entry Status on Team Manager. If not, it can be your friend. In Team Manager, click on Meets. Then, Entries and scroll to Swimmer Entry Status. Be sure to select your team at the top box that is shaded. Now you can go through and pre-enter or not make a swimmer available for that particular meet. If you know you have lots of swimmers gone, just go through individually. If you have most that will be there, click on the “Enter All” and individually click on “Not Attending” for those who won’t be there. You can also use the filters at the top to narrow the list down.

After you have done this, you can create a paper copy report to work on entries. This is especially helpful if you have assistant coaches that help with entries. There are two different kinds of reports you can create.
Athletes Attending Meet Report
One of the reports simply lists all the swimmers attending the meet. To create that report, click on Print at the top of the Swimmer Entry Status screen. This creates an Athletes Attending Meet report that looks like this:

Meet Entries Report Spreadsheet
The other report is a spreadsheet that can be used to mark entries. You can then use that to enter them into the computer. One funky little trick is this: You need to enter at least one swimmer into at least one event. I suggest entering a JV swimmer into the 50 Free or something like that. Then, to create this report, go back to the Meets screen. Once there, choose the meet you are working on, click Reports, and scroll down to Entry Spreadsheet. You can use the filters to break up the report, or simply print the entire team. Just make sure to check the boxes to Include Relays and Include Pre-Entered Swimmers with No Entries.

The Meet Entries Report spreadsheet will look like this:

Set Entry Limits
Another tip is to set entry limits. Click on Meets, highlight the meet you want to work on. Then, click Entries and select Max Entries. The limits for high school swimming are 2 individual events, 3 relays, and no more than 4 total entries. Now, when doing entries using the Entry by Event feature, the number of entries for each swimmer will show up and you will get a warning when you have exceeded the number of entries for a swimmer. (IE = Individual, RE = relay, CE = cumulative)
Choose Best Feature for Entry
Finally, there are two main ways to do your meet entries on Team Manager for Swimming. You can do them on the Entry tab by selecting Entries by Name or Enter by Event. Entries by Name is great for a larger team and you want to use the Group filter to quickly enter JV swimmers in the 50 and 100 Free. Enter by Event is the only way to do your relays. Select your team on the Swim for Team box at the top, then click New Relay on the box in the middle on the right. If you did pre-enter swimmers, check that box on the left side of the screen. Double click a name or click and drag to place a swimmer in the correct relay and correct spot. For Championship Meets, fill all 8 spots with the swimmers that you want eligible to be declared.
Additional File Types
Patrick Thurman’s Guide to Team Manager for Swimming Setup Checklist is also available in the following formats.
Google Doc
Click to access the setup checklist in Google Doc format. Then, “Make a Copy” and “Save.”
Suggestions Welcome
There are a number of ways to set up and use Team Manager for Swimming. Patrick welcomes suggestions and edits. Send them in using the website contact form.
Do you have another guide, list, or other information you find useful? If possible, we’d love to share it on HostGreatMeets.com to help make it easier for others to run effective competitive swim programs and meets. Please Add To The Pool!
Thank you for this informative content. Highly appreciated